This is a genuinely ancient report for the Battle of the Sabis River game we put on at the Society of Ancients Game Day way back in 2007. The battle, also know as the Sambre saw the Celtic Belgae take on the Roman legions under Julius Caesar. We used the warhammer Ancient Battles rules. Unfortunately, I don't think I still have any of the other documents mentioned but if I find them I'll add them.

Warhammer Ancient Battles - River Sambre Report

As one of the most popular sets of rules for Ancients wargaming, Warhammer Ancient Battles was rather conspicuous in its absence from last year's Society of Ancients games day, so I volunteered to rectify that this time around. My wonderful club mates at Southend-on-Sea Wargames Group (SSWG) were easily coerced into helping me out and the project begun. Warfare in antiquity has undergone something of a renaissance in interest at our club since the release of WAB, so we already had most of the figures needed, but were lacking a decent bit of terrain to play on. Fortunately, terrain building is something of a passion for us. Regulars at the SELWG or SALUTE shows may remember some of our previous demonstration games. The bad news was that we were simultaneously building a vast Caribbean harbour, complete with attacking Pirates, for SALUTE, the week after the SoA games day. So much for our plan to concentrate on one thing at a time but these things can't be helped, so we knuckled down and got to work.
The Battlefield

Having a rough idea of the scale and number of figures we would be using, we decided on a 12' x 6' battlefield. We constructed this in three 6' x 4' sections with the river running across the middle of all three. A box structure was built from plywood, over a light wooden frame. We have found this method works best, as it gives strength without too much weight. The battlefield itself was plywood with cloth strips soaked in PVA covering the gaps. We then layered the entire surface with several coats of a plaster-PVA mix, to blend out the imperfections of construction, and finished off with a light sand-gravel mix to provide texture. Once this was done, we painted the whole board a flat earth brown and dry brushed a lighter shade to bring out the detail. For the river we used boat varnish. The varnish is evil stuff and must definitely be used in a well-ventilated room. It also takes numerous coats to get the depth, each requiring a day or two to dry. However, the results are little short of spectacular giving a deep clear glossy finish at a reasonable price.
While on the subject of cost, I should point out that this whole project was done on a shoestring budget scraped together from our own pockets or the club's surplus funds. I mention this as on the day some people seemed under the impression, we were in league with Games Workshop and reacted as if terrain of this scope was beyond the ken of mortal gamers. However, besides a little play testing, and saying hello at shows, this is not the case. We have no official affiliation to Warhammer Historicals or any other games manufacturer and nearly all the materials we used are easily and cheaply available from builder's merchants or DIY shops.

Anyway, getting back to the board, we next added vegetation along the riverbanks. For the most part this was made from the bristles of an old broom that we had cut off in clumps and stuck into filler coloured with brown paint. The bristles make passable reeds and can be made more plant-like with a quick brush of PVA and sprinkle of flock. The next thing to add was the static grass. This was the most expensive part of the terrain and something of a new feature for us, as in the past we have either painted the boards green or made terrain without much grass. I understand from a recent conversation with a model trader though, that it is known as Dralon fibre, is available in almost any colour you can name and can be acquired much more cheaply in industrial quantities. If anyway knows more about this I'd be interested to hear from them. At first, we tried applying the static grass with PVA, just sprinkling it on with our fingers. This stuck okay but gave a rather patchy effect. We tried lighter brushing to distribute the PVA better and sprinkling from a bowl but neither was ideal. This process had covered most of the main areas of the board though, so all we now needed was to blend in the areas done to make the table less patchy. This we did by using matt spray model varnish and sprinkling the static grass from a great height to get a thinner coating. This method rectified the patchiness, much to our relief. After a few finishing touches, such as dry brushing up some of the rocks the board was ready.
The trees we had already made for a previous game and these were made from ruthlessly pruned rose bushes, with the thorns removed and horsehair, from an old cushion, covered in green flock for the foliage. The horsehair is not easy to come by but alternatives will work nearly as well and most clubs have model trees anyway. We fixed the trees to the boards by drilling small, and thus nearly invisible, holes randomly across the board. We had added cocktail stick points to the bottoms of the trees, so these could then be placed in the holes. The advantage of doing this is that the trees can be varied or removed entirely as required for other games. By the time of writing the boards have been used as a treeless east European steppe for a 17th century Turco-Polish battle and as a heavily conifer-forested valley for a 1942 Russian front game.

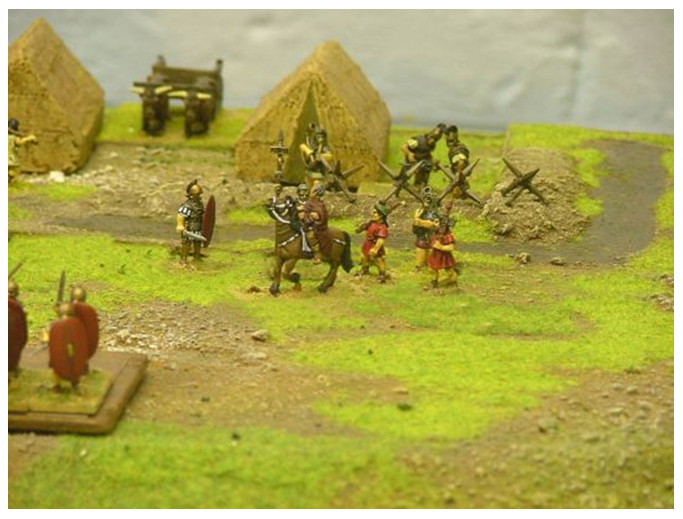
With the board completed we turned our attention to the man-made features of the battlefield. The most important were the Roman camp and the hedges. The hedges we already had, obsessive terrain building accumulates quite a stock of re-usable pieces, but the camp was a something new. The ditch and earth banks were simply made as smaller versions of the main table, with hardboard bases, cut to shape, and then polystyrene and plaster/PVA etc. over the top. The camp was supposed to be unfinished and of negligible tactical value in the battle, so the ditches were little more than scrapes and the earth banks low. To add a little style to these rather grubby earth banks, we constructed a few of the spiked defences the Romans used on the earth banks. These were made from 1st Corps' cast lead stakes. They come in a long straight palisade but we cut them up and put them together in the caltrop-like shape proposed by Kate Gilliver. This looked rather good and if complete would no doubt have provided a serious obstacle for any attackers to cross. To complete the camp, we needed a few tents. to make these a pro forma was made from a wooden block covered in mastic putty and marked to give the effect of sewn leather. A rubber mould was made from this and a half dozen resin tents turned out. This is a more advanced procedure but not as difficult as you might think. Tents could even be made to order, for a small fee, if anyone needs them.

The Armies
For the armies in the scenario we adopted a scale of 200:1. This allowed the most prominent tactical unit in Caesar's account, namely the Legion, to be represented by an average sized WAB unit of 24 figures. For the Belgae we arbitrarily chose large unwieldy 50 figure units to help represent their inferior manoeuvrability. The troop stats for the battle were all drawn from the lists provided in the main WAB rulebook, with some slight alterations as discussed below. The figures we used were 28mm and from a variety of manufacturers including Gripping beast, Foundry, Matchlock, Old Glory, Navigator and 1st Corps. Special mention goes to 1st Corps' excellent Roman engineers, who really added to the look of the camp.
The Romans

We made Caesar's original four legions (VIIth-Xth) veteran legionaries. This was contrary to the scenario document's request to make them average quality but we felt that they had been undervalued. These four legions predated Caesar's arrival in Gaul and there is a good chance they had even been involved in prior campaigning. What's more they had fought in two successful campaigns the previous year and as such we felt they would be both well trained, experienced and motivated. The two legions Caesar had raised in 58BC (XIth and XIIth) we felt would have, by mid 57BC, been properly trained and with a victory against the Germans under their belt were rated as regular legionaries. The newly raised legions (XIIIth and XIVth) were obviously raw legionaries. With the cavalry, we again slightly departed from the scenario outline and allowed Caesar 2000 Gallic horse. The Gauls had provided 4000 horse the year before and even taking into account the missing Treveri, and assuming others were away scouting, 1000 just seemed too low a number. These, and the late arriving Treveri, were unsurprisingly graded as barbarian noble cavalry. Due to the large game scale, the auxiliary light infantry were barely worth representing but we included them anyway to add a little variety to the Roman army. To minimise their impact however we chose to represent them as three five figure units. This is the smallest unit allowed in WAB and as such has very little staying power and is therefore unlikely to be a battle winner. Lastly, we added some scorpios to the camp. Although not actually mentioned by Caesar they were typical equipment and it seemed reasonable that, if present, they would be set up early in laying out the camp. As far as characters went, we chose to restrict their impact on the game and limit them to only those directly mentioned in Caesar's text. Therefore, only Caesar himself and Labienus were represented on the Roman side.
In summary the Roman Army List was as follows:
Caesar (Army General)
Labienus (Legate)
Roman Army Standard Bearer
4 x 24 Veteran Legionaries (VIIth-Xth)
2 x 24 Regular Legionaries (XIth & XIIth)
2 x 24 Raw Legionaries (XIIIth & XIVth) (off table at start)
1 x 10 Allied Noble Cavalry
1 x 5 Allied Barbarian Skirmishers (Numidian Javelinmen)
1 x 5 Allied Barbarian Skirmishers (Balearic Slingers)
1 x 5 Auxiliary Archers (Cretans)
4 x Scorpio Light artillery (must be placed in the camp)
1 x 5 Allied Noble Cavalry (Treveri) (off table at start)
The Belgae

Caesar's account of the battle portrays the Nervii as brave warriors, fighting to the death, so we decided to give them above average morale. This was accomplished by raising their Leadership stat a point. For the rest of the Belgae's stats, we used the latest barbarian warrior stats from the Spartacus supplement, rather than the original rulebook stats. We did this as we felt these newer stats better represented the Celtic warriors of the period. We decided not to further raise the fighting ability of the Nervii though, as despite their bravery, we felt they did not show any exceptional skill during the battle itself. For the Atrebates and Veromandui the numbers given by Caesar were not actually for their contingents at the Sambre itself but for the Belgic confederation army earlier in the year. The scenario document suggested using these numbers anyway but as the Nervii at the Sambre were 20% greater than their confederation force, we felt the other tribes should be likewise increased when fighting with their immediate neighbours. This gave us 18,000 and 12,000 for the Atrebates and Veromandui respectively. The Belgic noble cavalry were represented in token force only as the Nervii are specifically described as weak in cavalry and the other tribes were small. The only Belgic character named in the sources is the chieftain Boduognatus. Caesar says he was acting as war leader for the Nervii but does not specify he was commanding the whole army, so we made the non-Nervii allied tribes, which in WAB means they cannot use the Army General's leadership bonuses.
In summary the Belgic Army List was as follows:
Boduognatus (Warlord)
Nervii ASB
Nervii 6 x 50 Warriors with throwing spear upgrade (+2 pts) and +1 Ld (+1 pt)
Atrebates 2 x 45 Allied Warriors with throwing spear upgrade (+2 pts)
Veromandui 2 x 30 Allied Warriors with throwing spear upgrade (+2 pts)
Cavalry 1 x 6 Allied Noble Cavalry with thrusting spears
Special Scenario Rules
For the scenario details we started from a web published scenario written several years ago by WAB's author, Jervis Johnson. However, as time went on we changed many features of Jervis' original scenario and our finished product eventually bore little resemblance to Jervis' original. Still it helped to have a pro forma to work from, so thanks to Jervis for that and the features of his original that still remain.
For the game length we opted for nine turns. This is a bit longer than the common six turn WAB tournament game format but due to the nature of the scenario was required to give the Xth legion any chance of covering the ground they did historically. Nine turns was intended to make it difficult, but not impossible, for the Roman left to beat the allied tribes, and close in on the rear and flank of the Nervii before the Roman right collapsed. Victory would be decided by the usual WAB victory point mechanisms at the end of the game, or earlier if one side destroyed or routed over 50% of the opposing army.

The Roman Camp was set up as shown on the scenario pack map. Half the figures from each legion, representing the guard cohorts, were set up in formed units up to 18" in from the Roman bank of the river. The remaining figures from each legion were placed in a loose formation around the camp to represent foragers and workers. Some were replaced with Roman engineer models to improve the aesthetics. These men would rejoin their units at a randomly determined rate during the early turns of the game. In previous play test games we'd opted for the more radical approach of having no guard cohorts, as in fact was suggested by Phil Sabin in his introductory talk, but increasing the number of figures that rally to the standards each turn. This approach made little practical difference to the game but did help intimidate the Roman players and add to the sense of surprise and panic they felt at deployment. At the beginning of the battle, Caesar was overseeing the camp's construction and so we initially placed him within the bounds of the camp. The Roman Scorpios were also deployed within the bounds of the camp and no closer than 6" to each other. Labienus was in command of the Roman left and so we stipulated he must be placed within 6" of one of the two left-hand Roman legions (IXth and Xth). The Roman auxiliaries were deployed on the Belgic side of the river up to 18" from the tree line. We also required them to be placed on the left-hand side of the table, from the Roman perspective, so that they faced off against the Atrebates and Veromandui. We felt this was appropriate, as historically they had previously been engaged with the Belgic cavalry, who would have been primarily drawn from these tribes. No Belgic figures were required to be placed at the start of the game as they are assumed to be hiding in the edge of the woods. Our Belgae players however, did in fact deploy their troops in the woods to intimidate the Roman players with their numbers.
Caesar gives us an unusually detailed picture of the Sambre battlefield in his commentaries and there are several distinctive terrain features that need representing in the scenario. However, reading between the lines they do not overly impact the course of the battle, so we felt moderation was needed when assigning game effects. The hills themselves were gentle and do not seem to have been difficult to climb. So we assigned the standard WAB combat bonus to the higher unit when fighting on the slopes but no movement penalty. The river posed slightly more of a problem. From Caesar's description, the river, despite having steep banks, was relatively shallow and does not seem to have greatly impeded the movement of troops in either direction. However, in WAB, rivers are quite major obstacles in rules terms. As rough terrain they not only half your standard movement, but also prevent march moving. As such they effectively quarter the movement of troops not closely engaged with the enemy, as the Belgae would be in this case. With the approximately 4" wide river we had modelled on our terrain piece this would mean a crossing time of 2-3 turns, which seemed rather excessive. Of perhaps even greater impact is that rough terrain negates the addition of the combat ranks that are vital to winning combats in WAB. Therefore a unit could sit close by the edge of a piece of rough terrain and engage any unit emerging before they had had a chance to clear the terrain and form up properly. This could make the river into a more of a defensive obstacle than we felt it should be. As a result of these issues, we ignored the river for both movement and combat penalties. However, on closer inspection I have since noticed that 'fords', to which group any fordable section of a river presumably belongs, are exempt from this last effect and so perhaps the river could have been counted as rough terrain after all. The hedges on the battlefield are an altogether different kettle of fish. Described by Caesar as not even letting light through, these must have been serious obstacles. We therefore counted them as WAB rules obstacles, with all their associated movement and combat penalties. In fact we even increased these to stipulate that they block line of sight and the special leadership and break test re-roll functions of Army Generals and Army Standard Bearers. Movement through them was possible but would be slow and leave the unit vulnerable as discussed above. This effectively cuts the Roman side of the river into three sections that are not easily traversed.
In addition to the grading discussed above we also created or borrowed some special scenario rules to add historical details to the game. The flexibility and ease with which such details can be added is one of WAB's main strengths and in my opinion WAB is well suited to scenario play. The special rules used were as follows:
"Caesar had every thing to do at once"

The Belgae caught Caesar by surprise with many of his troops dispersed while constructing their camp. To represent this, no Roman Legionary unit may move for the first 2 turns of the game, as they are assumed to be forming their ranks and recovering stragglers. Those legionaries dispersed as workers and foragers rejoin their legions at d6 figures per turn at the beginning of the Roman movement phase.
"They rushed out suddenly"

On their first turn the Belgae units may move out their full unmodified charge distance from the edge of the woods within their deployment area. Any Roman units within this distance are considered charged and must respond accordingly. The full charge distance may still be moved, even if the target unit flees.
Roman Reinforcements
The Roman reinforcements arrive on the fifth and sixth Roman turns at the start of the movement phase. On the fifth Roman turn one Roman player may place the Treveri cavalry on the Roman baseline up to 18" to the left of the camp and one of the two Raw legions on the Roman baseline up to 18" to the right of the Roman camp. On the sixth Roman turn one Roman player may place the remaining Raw Legion up to 18" to the right of the Roman camp. These units deploy following the rules for flank marching troops in the Flank Attack scenario in the Warhammer Ancient Battles rulebook.
Nervous Treveri

The Treveri were renowned as the finest cavalry in Gaul, yet at this battle they turned tail and fled without a fight. It is likely that on arriving to see the Belgae in the Roman camp, they assumed Caesar had been defeated and not being the most loyal of allies simply chose to ride off rather than support a doomed cause. To represent this possibility, if any Belgic unit is visible in the Roman camp, the Roman player deploying the Treveri should roll a die and remove them again on a roll of 1-3.
All Round Defence
Caesar says that he ordered the tribunes of the XIIth and VIIth legions to draw their legions together and form a double front. This special formation protected the rear and flanks of the Roman troops and enabled them to hold their ground until help arrived. In game terms it is a special formation that may be formed by any Roman legionary unit much like the squares of the Napoleonic era. The unit must reform to adopt or abandon it and cannot move whilst it is maintained.
A unit in all round defence must be formed into as square a formation as possible and once done so has no flanks or rear. Additionally the formation receives a +1 armour save versus missile attacks and calculates its rank bonus on the number of figures in the unit.
18 or more....+3 rank bonus
12-18.........+2 rank bonus
6-12..........+1 rank bonus
0-6...........none
Gaius Julius Caesar
Caesar was one of the great captains of history and the game should reflect his exceptional talents. As such Caesar uses the stats for a Roman general but adds one to Initiative, to represent his famous speed of thought and action (Celeritas), and one to Leadership to represent his manly demeanour (Veritas). In addition Caesar is also Inspirational and a Great Orator as described below.
Great Orator
Caesar's oratory skills were widely respected and this special rule represents his ability to set men's heart's aflame with purpose. On any turn that Caesar is stationary and in base-to-base contact with an unengaged Roman unit, he may use his oratory skills to encourage them. Any unit so encouraged may re-roll all it's missed to hit rolls in their next hand-to-hand combat phase.
Inspirational
Caesar was an extremely brave and Charismatic man. To represent this any unit led by Caesar will exert itself that little bit harder in combat, and may therefore add +1 to its combat results score.
The Battle

The game itself was played with three players a side, each controlling one of the sectors of the battle. Five of the players were from my own club. Our master terrain builder, Andy F, Andrew 'Freddy' S and our industrial quantity painter, Alan C, played the Belgae. While our young patrician, James B, special guest star, Adrian G, and myself played the Romans. We were a bit disappointed that we didn't have more volunteers from amongst the other attendees, particularly as Adrian was rather kidnapped for interrogation after his talk but apparently two expected players had had to drop out at the last minute. Still, we had fun and will probably run the game in full again at our club if anyone is interested.
I won't go into excessive detail on the battle itself as blow-by-blow accounts of games mechanisms are rarely gripping. However, here is a summary of the action.
The Belgae rushed out of the woods as expected and unsurprisingly saw off the Roman light troops deployed in front of them. Caesar, in historical fashion, dashed to the Xth legion to deliver his oration and then made his way to the centre of the field. The legions themselves had little or no time to adjust their positions prior to the Belgic attack but had mostly recovered their stragglers in time. The Xth heroically fought off a flank attack by the Belgic cavalry and then, in concert with the IXth, threw the Atrebates back across the river, the Xth destroying one group in the pursuit across the river, just as Caesar says happened historically. Some of the light troops rallied and supported this attack, whilst the terrified Numidians continued to run for the camp. The allied Gallic horse rallied but achieved little as they and the, by now also rallied, Belgic cavalry were then locked in combat for the rest of the battle. Meanwhile, in the centre the Veromandui advanced more cautiously. The Tribune 'Hadrian', commanding the Roman centre, quickly threw out his legions into a shallow formation, by virtue of their excellent drill, and charged, much as Caesar did historically with the legions on the right. The reason for this was to get the maximum number of men fighting but it is a risky endeavour in WAB as retaining the maximum +3 rank bonus is usually the better option for achieving victory in close combat. However, the gamble paid off and the Veromandui were routed and many slain trying to flee across the river. The XIth chased the remaining Veromandui into the trees, while the veteran VIIIth remained on the Roman bank to protect the camp. The huge numbers of the Nervii made it difficult for them all to get into the battle and so, while their main force crossed the river and attempted to surround the Roman right, several large groups broke away and moved to the centre of the field. The unfortunate VIIIth were consequently thrown back from the water's edge, and rapidly surrounded. These grim veterans were not so easily broken however, and forming into an all round defence, dug in to weather the storm.

Back on the Roman left the IXth began to re-cross the river into the centre of the field towards their now surrounded comrades of the VIIIth. The Xth were unable to join them as some of the Atrebates had rallied in the trees and they were forced to engage them. In the centre the XIth had chased the remnants of the Veromandui from the field and now joined the IXth in marching to the relief of the VIIIth. Time was not on their side though as the surrounded legionaries of the VIIIth fought bravely on against impossible odds as Caesar looked on unable to help. Fortunately for these brave sons of Rome, Nike was smiling down on them and the cavalry, in the shape of the Treveri, and in the best tradition of 50s westerns, arrived just in time. With the Roman camp secure, the Terveri were undaunted by the Belgic presence and charged straight into the rear of Nervii surrounding the VIIIth. The morale of the Nervii collapsed, many being killed in the resulting rout and others fleeing in panic upon the destruction of their kin.
Just before this death-or-glory charge was taking place, the Belgae finally launched a full-scale attack against the Roman right, who had been gradually withdrawing in the face of the Nervic horde. The will of the Nervii was obviously failing however, as there was no conviction in their charge and they rapidly found themselves fleeing back to the river, hotly pursued by the VIIth and XIIth legions. Rallying on their own side of the river the Nervii managed to grab a tiny consolation as one group forced back the XIIth but the VIIth broke Boduognatus' own warband and cut down the Warlord in the pursuit. With the Belgic Chieftain slain, his army in tatters and the newly arrived XIIIth and XIVth legions mopping up the last barbarians on the Roman side of the river, Caesar was free to retire to camp and begin to consider how best to inform the Roman people of this latest victory.

Analysis
As far as the result goes I think it was on the whole very historical, perhaps even surprisingly so. Many of the features of the real battle were recreated and although at the detailed mechanism level some aspects were probably a little gamey, overall I don't think there was much that couldn't be justified. Admittedly, the scenario was quite heavily tailored in places but I see the ease with which this can be done as a strength of WAB, in that the rule set provides the necessary palette of stats and rules with which to fine tune the game. The Romans, with the exception of the crippled VIIIth, probably had a slightly easier time of things than their historical counterparts, particularly on the right flank but the result is deceptive and with a few different dice rolls things could easily have looked very different for the Belgae and the game was actually much closer then the outcome suggests.
Addendum
Having now played the game a few more times it does seem that the odds are somewhat stacked in the Romans favour. The barbarians can overcome the legionaries but need quite a bit of luck to do this in more than one isolated case and although they have given the Romans a bloody nose is some of our games they are yet to win a decisive victory. In terms of hard numbers, the Romans have a slight overall points advantage but not all their troops are present from the start and while they have the initial terrain advantage, they also have some restrictive special rules. All this probably matches history very well in that the Gauls did eventually learn that taking the legions on head to head was suicide but in order to make for a more balanced game players may like to add a little extra fighting power to the Gallic side. This can be achieved quite easily by the addition of a few extra chieftains or possibly upgrading some of the Nervii warbands to WS4 as suggested in Jervis original scenario. Another alternative is to reduce the number of Romans. Caesar did have a ready source of citizen recruits in Cisalpine Gaul and he supplemented this with volunteers from Italy and even men not officially allowed to serve, such as Latins and even Gauls. However in only the second year of campaigning his reputation as a military genius was not yet assured and after two hard fought battles the year before his veteran legions may not have been at full strength. Reducing these to 20 figures or less, instead of 24 may therefore be historical and have quite a significant game effect as it gives the Gauls a greater chance to retain the 2:1 ratio needed to Fall back in good order. If anyone does try this scenario I'd be interested to hear the results.
